From Puddle to Lake: Auto-Transforming Your Raw Data with Cloudflare Event Notifications
Set up automatic data transformation for your Cloudflare data lake. This step-by-step guide shows how to configure event notifications and Workers to seamlessly process raw pipeline data into analytics-ready Iceberg tables.

Table of Contents:
- The Missing Piece: What Happens After Data Lands?
- Event Notifications: Your Data Lake’s Early Warning System
- The Filtering Challenge: Separating Signal from Noise
- Building the Transformation Worker
- Handling Production Concerns
- Testing the Complete Flow
- What’s Next: Advanced Patterns
The Missing Piece: What Happens After Data Lands?
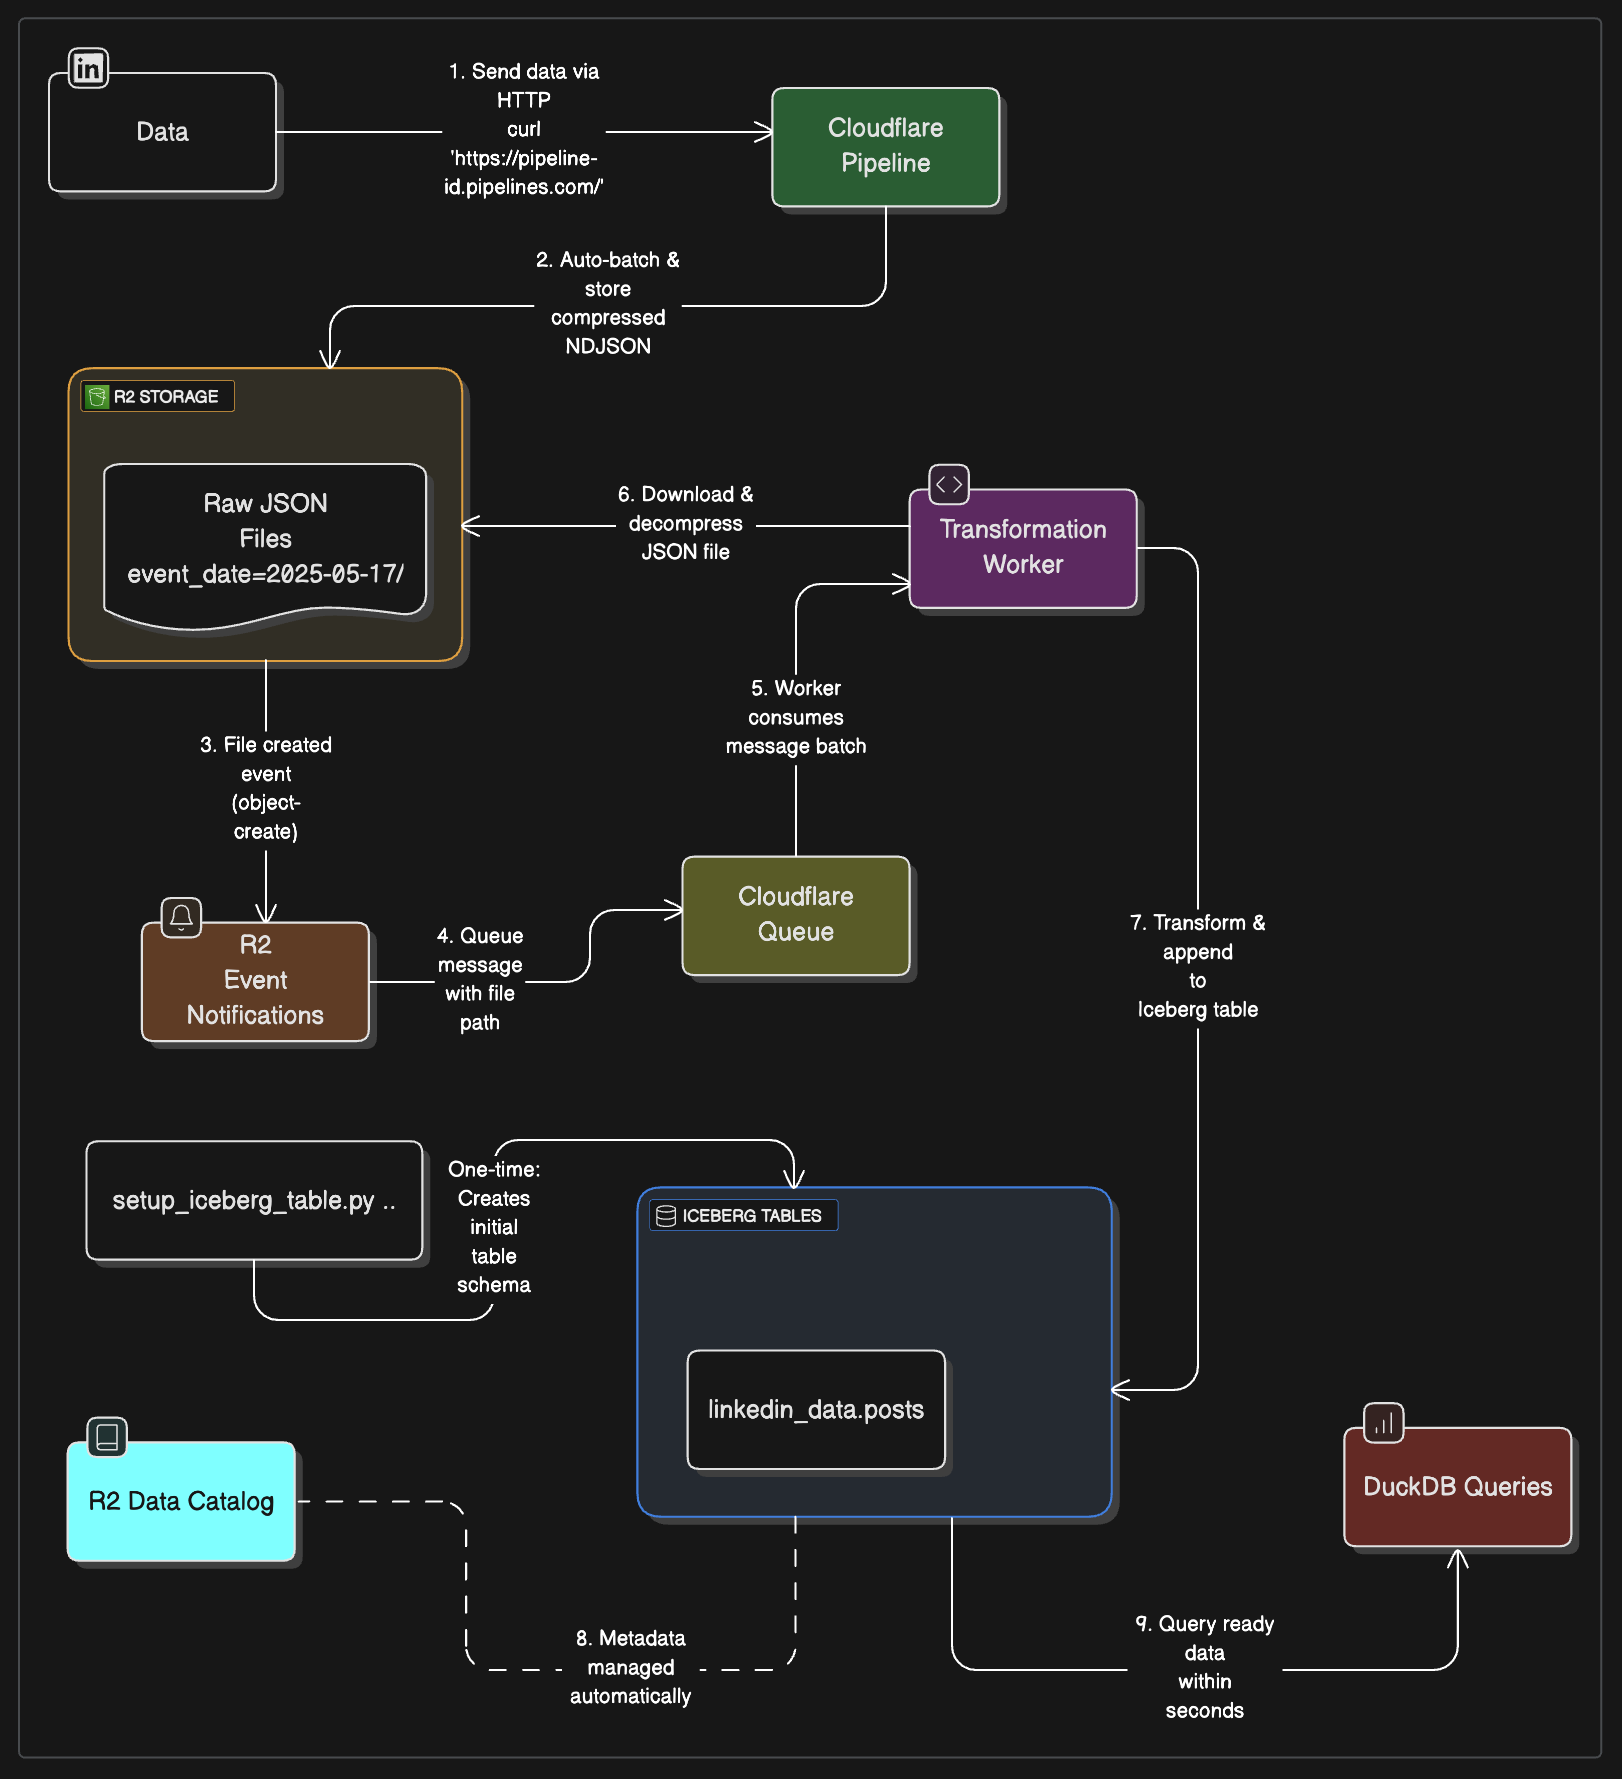
In our previous post, we built a beautiful data pipeline that ingests LinkedIn posts, job listings, and website content through Cloudflare Pipelines, landing them as compressed NDJSON files in R2. We even got DuckDB querying our Iceberg tables. Everything works… until you realize there’s a human in the loop.
The Manual Bottleneck
Right now, our flow looks like this:
- Data Sources → Pipeline ✅ Automated
- Pipeline → R2 Storage ✅ Automated
- Raw Storage → Iceberg Tables ❌ Manual
- Iceberg Tables → Analytics ✅ Automated
The Real Problem
Let’s look at what’s actually happening. Your Pipeline writes files like this:
raw-company-data/event_date=2025-05-17/hr=14/01JVFB237R9VWPHN96KWH2R1P0.json.gzEach file contains a batch of compressed JSON records that look like this:
{"post_id": "7325991787351658498", "content": "Stop by at 2025 Conference...", "timestamp": "2025-05-12T14:37:21.366134"}
{"post_id": "7323125315566714880", "content": "Live from RSA Conference...", "timestamp": "2025-05-10T14:38:38.205988"}
But your analytics queries expect data in Iceberg tables with proper schema, partitioning, and columnar storage. The gap between “data landed” and “data queryable” is entirely manual.
What We’re Going to Build
The solution as many things with cloudflare is beauty of event-driven notification. Every time Pipeline writes a new file, we’ll automatically:
- Detect the new file via R2 event notifications
- Filter out the noise (Iceberg’s own metadata writes)
- Transform the raw JSON into proper tabular format
- Append the data to our Iceberg tables
- Handle errors gracefully with retries
By the end of this post, your data lake will process new data within seconds of it landing, without any human intervention. Your weekend self will thank you.
Event Notifications: Your Data Lake’s Early Warning System
When a file lands in your R2 bucket, Cloudflare can send a notification to a Queue. Your Worker subscribes to that Queue, gets each notification and processes the file. It’s pub/sub for object storage.
The Two Events That Matter
There are two event types:
object-create- new files arrive (this is what we want)object-delete- files get removed (maybe useful for cleanup)
What a Notification Looks Like
When Pipeline writes a file, you get a message like this:
{
  "account": "b846a37c6228b2869896493f338f17d5",
  "bucket": "raw-company-data",
  "eventTime": "2025-05-17T14:46:08.516Z",
  "action": "PutObject",
  "object": {
    "key": "event_date=2025-05-17/hr=14/01JVFB237R9VWPHN96KWH2R1P0.json.gz",
    "size": 20700,
    "eTag": "838c66dae4d013090cfa71220caedba3"
  }
}
Perfect! This tells us exactly what file to process.
The Filtering Challenge
You’d think “just process every notification” would work, but your R2 bucket is busier than you might expect. Remember, when we write to Iceberg tables, the R2 Data Catalog itself creates files. And those trigger notifications too.
Understanding What Triggers What
Let’s look at the actual notifications you’ll receive:
The Good Stuff (Pipeline data we want to process):
{
  "account": "b846a37c6228b2869896493f338f17d5",
  "bucket": "raw-company-data",
  "eventTime": "2025-05-17T14:46:08.516Z",
  "action": "PutObject",
  "object": {
    "key": "event_date=2025-05-17/hr=14/01JVFB237R9VWPHN96KWH2R1P0.json.gz",
    "size": 20700,
    "eTag": "838c66dae4d013090cfa71220caedba3"
  }
}
The Noise (Iceberg metadata we need to ignore):
{
  "account": "b846a37c6228b2869896493f338f17d5",
  "bucket": "raw-company-data",
  "eventTime": "2025-05-20T09:15:47.976Z",
  "action": "PutObject",
  "object": {
    "key": "__temporary/.test_pipelines_access",
    "size": 1,
    "eTag": "68b329da9893e34099c7d8ad5cb9c940"
  }
}
More Noise (Iceberg data files):
{
  "account": "b846a37c6228b2869896493f338f17d5",
  "bucket": "raw-company-data",
  "eventTime": "2025-05-20T09:58:47.263Z",
  "action": "CompleteMultipartUpload",
  "object": {
    "key": "__r2_data_catalog/0196dcff-40b8-7d62-8bfb-b093cdcf2d93/0196dcff-7160-7ff2-884b-57a396f55a58/data/00000-0-be468ac1-c4ec-4a80-bac7-9d805003404d.parquet",
    "size": 30928,
    "eTag": "8f3095314143f812f3eb4b67a5695063-1"
  }
}
See the pattern? Pipeline writes to paths like event_date=2025-05-17/hr=14/..., while Iceberg writes to __temporary/ and __r2_data_catalog/.
Smart Filtering Strategies
Set up your event notification rule with a prefix filter:
wrangler r2 bucket notification create raw-company-data \
  --event-type object-create \
  --queue pipeline-events \
  --prefix "event_date="
This only sends notifications for files that start with event_date=, which is exactly what Pipeline creates.
Handles custom prefixes - If you ever use --r2-prefix with Pipelines, you’d just update the notification filter to match (e.g., --prefix "myprefix/event_date=")
The Edge Cases
Keep in mind a few gotchas:
- Iceberg might create temporary files with unpredictable names
- Failed uploads might leave partial files
- Your Pipeline might occasionally write to different paths
The filtering logic needs to be defensive. When in doubt, err on the side of processing fewer files rather than processing the wrong ones.
Building the Transformation Worker
Now that we understand the filtering strategy, let’s build the Worker that will automatically transform our raw pipeline data into Iceberg tables. The beauty of this approach is that PyIceberg handles all the complex Iceberg operations for us.
Setting Up the Event Notification Rules
First, create the queue and notification rule:
# Create a queue for pipeline events
wrangler queues create pipeline-events

# Set up the notification rule with prefix filtering
wrangler r2 bucket notification create raw-company-data \
  --event-type object-create \
  --queue pipeline-events \
  --prefix "event_date="
This ensures we only get notifications for actual pipeline data files.
Creating the Processing Worker
Create a new Worker project:
mkdir pipeline-processor
cd pipeline-processor
npm create cloudflare@latest -- --type hello-world
Update your wrangler.toml:
name = "pipeline-processor"
main = "src/index.js"
compatibility_date = "2024-04-05"

[[queues.consumers]]
queue = "pipeline-events"
max_batch_size = 10
max_batch_timeout = 30

[[r2_buckets]]
binding = "BUCKET"
bucket_name = "raw-company-data"

[vars]
CATALOG_URI = "https://catalog.cloudflarestorage.com/{your-account-id}/raw-company-data"
WAREHOUSE = "{your-account-id}_raw-company-data"
R2_TOKEN = "your-r2-api-token"
Building the Transformation Worker
Our Worker will act as a lightweight trigger that calls an external Python service to handle the Iceberg processing, since Cloudflare Workers don’t support PyIceberg yet.
export default {
	async queue(batch, env, ctx) {
		console.log(`Processing batch of ${batch.messages.length} messages`);

		for (const message of batch.messages) {
			try {
				const notification = message.body;
				console.log(`Processing file: ${notification.object.key}`);

				// Trigger external Python processor
				await triggerIcebergProcessor(notification, env);
				message.ack();
			} catch (error) {
				console.error(`Failed to process ${message.body.object.key}:`, error);
				message.retry();
			}
		}
	},
};

async function triggerIcebergProcessor(notification, env) {
	const objectKey = notification.object.key;

	try {
		const response = await fetch(env.ICEBERG_PROCESSOR_URL, {
			method: 'POST',
			headers: { 'Content-Type': 'application/json' },
			body: JSON.stringify({
				bucket: env.BUCKET_NAME,
				object_key: objectKey,
				table: env.TABLE_NAME,
				action: 'process_and_ingest',
			}),
			signal: AbortSignal.timeout(30000), // 30 second timeout
		});

		if (!response.ok) {
			throw new Error(`Processor responded with ${response.status}`);
		}

		console.log(`Successfully triggered Iceberg processing for ${objectKey}`);
	} catch (error) {
		console.error(`Failed to trigger Iceberg processor: ${error}`);
		throw error; // Re-throw to trigger message retry
	}
}
External Python Processor
You’ll need to deploy a FastAPI service somewhere (VPS, Railway, Render, etc.) to handle the actual Iceberg processing:
# iceberg_processor.py
from fastapi import FastAPI, HTTPException
from pydantic import BaseModel
import boto3
import gzip
import json
from pyiceberg.catalog.rest import RestCatalog
import pyarrow as pa
import os
import logging
from botocore.client import Config
import pandas as pd

logging.basicConfig(level=logging.INFO)
logger = logging.getLogger(__name__)

app = FastAPI()

class ProcessRequest(BaseModel):
    bucket: str
    object_key: str
    table: str
    action: str

R2_ACCOUNT_ID = os.getenv('R2_ACCOUNT_ID')
# Initialize R2 client
s3_client = boto3.client(
    's3',
    endpoint_url=f'https://{R2_ACCOUNT_ID}.r2.cloudflarestorage.com',
    aws_access_key_id=os.getenv('R2_ACCESS_KEY_ID'),
    aws_secret_access_key=os.getenv('R2_SECRET_ACCESS_KEY'),
    region_name='auto',
    config=Config(signature_version='s3v4', s3={'payload_signing_enabled': False})
)
logger.info("S3 client initialized successfully")

# Initialize Iceberg catalog
catalog = RestCatalog(
    name="company_intel",
    uri=os.getenv('CATALOG_URI'),
    warehouse=os.getenv('WAREHOUSE'),
    token=os.getenv('TOKEN')
)
logger.info("Iceberg catalog initialized successfully")

@app.post("/api/iceberg")
async def process_data(request: ProcessRequest):
    logger.info(f"Received request: {request}")
    if s3_client is None:
        logger.error("S3 client not initialized")
        raise HTTPException(status_code=500, detail="S3 client not initialized")
    if catalog is None:
        logger.error("Iceberg catalog not initialized")
        raise HTTPException(status_code=500, detail="Iceberg catalog not initialized")

    try:
        # Download and decompress file from R2
        response = s3_client.get_object(Bucket=request.bucket, Key=request.object_key, ChecksumMode='DISABLED')
        logger.info("S3 connection test successful")
        compressed_data = response['Body'].read()
        logger.info(f"Downloaded {len(compressed_data)} bytes from R2")
        if compressed_data[:2] == b'\x1f\x8b':
            logger.info("File is gzipped - decompressing")
            decompressed_data = gzip.decompress(compressed_data).decode('utf-8')
        else:
            logger.info("File is already decompressed - using as-is")
            decompressed_data = compressed_data.decode('utf-8')

        logger.info(f"Decompressed to {len(decompressed_data)} characters")

        # Parse NDJSON
        records = []
        for line in decompressed_data.strip().split('\n'):
            if line.strip():
                records.append(json.loads(line))

        # Transform records
        arrow_table = transform_records(records)
        logger.info(f"Created PyArrow table with {arrow_table.num_rows} rows")
        table = catalog.load_table("linkedin_data.posts")
        table.append(arrow_table)
        logger.info("Successfully appended to Iceberg table")


        return {
            "status": "success",
            "records_processed": len(records),
            "file": request.object_key
        }

    except Exception as e:
        raise HTTPException(status_code=500, detail=str(e))
"""
When creating your Iceberg table, use:
schema = pa.schema([
    pa.field("post_id", pa.string()),
    pa.field("content", pa.string()),
    pa.field("hashtags", pa.list_(pa.string())),
    pa.field("url", pa.string()),
    pa.field("timestamp", pa.string()),  # as string!
])

Then your transform becomes:

def transform_records(raw_records):
    for record in raw_records:
        if 'hashtags' not in record:
            record['hashtags'] = []
    return pa.Table.from_pylist(raw_records)
"""
def transform_records(raw_records):
    # Just ensure required fields exist
    for record in raw_records:
        if 'hashtags' not in record:
            record['hashtags'] = []

    # Create full table first
    full_table = pa.Table.from_pylist(raw_records)

    # Select only expected columns
    expected_columns = ['post_id', 'content', 'hashtags', 'url', 'timestamp']
    available_columns = [col for col in expected_columns if col in full_table.column_names]
    filtered_table = full_table.select(available_columns)

    # Convert timestamp string to timestamp type using pandas
    if 'timestamp' in filtered_table.column_names:
        timestamp_col = filtered_table.column('timestamp')
        # Use pandas for flexible timestamp parsing
        timestamp_converted = pa.Array.from_pandas(
            pd.to_datetime(timestamp_col.to_pandas(), utc=True).dt.tz_localize(None)
        ).cast(pa.timestamp('us'))

        # Replace the timestamp column
        filtered_table = filtered_table.set_column(
            filtered_table.schema.get_field_index('timestamp'),
            'timestamp',
            timestamp_converted
        )

    return filtered_table

if __name__ == "__main__":
    import uvicorn
    uvicorn.run(app, host="0.0.0.0", port=8009)
Deploy and Test
Deploy your Worker:
wrangler deployThat’s it! Your Worker is now ready to automatically process pipeline data. Here’s what happens:
- Pipeline writes file →
event_date=2025-05-20/hr=14/01JVFB237R9VWPHN96KWH2R1P0.json.gz - R2 sends notification → Queue receives message about the new file
- Worker processes message → Downloads, decompresses, transforms data
- Data lands in Iceberg → Available for immediate querying
Testing the Flow
To test your setup, send some data through your pipeline:
curl "https://your-pipeline-endpoint.pipelines.cloudflare.com/" \
  -d '[{"post_id": "test123", "content": "Test post", "timestamp": "2025-05-20T10:00:00Z"}]'
Within seconds, you should see:
- A new file in your R2 bucket
- Worker logs showing the processing
- New data in your Iceberg table ready to query
The Worker handles all the complexity - decompression, parsing, schema transformation, and Iceberg integration - while being completely serverless and cost-effective.
Handling Production Concerns
Error Handling and Retries
The good news is that Cloudflare Queues handle most of the heavy lifting for you. If your Worker throws an error, the message automatically gets retried. Here’s the minimal error handling you need:
      try {
				const notification = message.body;
				console.log(`Processing file: ${notification.object.key}`);

				// Trigger external Python processor
				await triggerIcebergProcessor(notification, env);
				message.ack();
			} catch (error) {
				console.error(`Failed to process ${message.body.object.key}:`, error);
				message.retry(); // <--- here
			}
Monitoring Your Pipeline
Keep an eye on these basics:
- Worker logs in the Cloudflare dashboard to see processing status
- Queue metrics to check if messages are backing up
- R2 bucket to verify files are being processed (old files might indicate issues)
When Things Go Wrong
If you see files not being processed:
- Check the Worker logs for errors
- Verify your R2 token permissions
- Make sure your Iceberg table schema matches your data
That’s it! For most use cases, this basic setup will handle thousands of files reliably.
Testing the Complete Flow
Let’s validate that our entire pipeline works end-to-end. We’ll send test data through the pipeline and verify it lands in our Iceberg table.
Send Test Data to Your Pipeline
First, let’s send some sample data through your Cloudflare Pipeline:
# Send a test event with realistic data
curl "https://your-pipeline-endpoint.pipelines.cloudflare.com/" \
  -H "Content-Type: application/json" \
  -d '[
    {
      "post_id": "test_12345",
      "content": "Testing our automated data pipeline! 🚀",
      "hashtags": ["DataEngineering", "Cloudflare", "Automation"],
      "url": "https://example.com/test-post",
      "timestamp": "2025-05-20T15:30:00Z"
    },
    {
      "post_id": "test_67890",
      "content": "Another test post to verify batch processing",
      "hashtags": ["Testing", "DataLake"],
      "url": "https://example.com/test-post-2",
      "timestamp": "2025-05-20T15:31:00Z"
    }
  ]'
Verify Each Stage
1. Check R2 Bucket Within a few minutes, you should see a new file in your bucket:
raw-company-data/event_date=2025-05-20/hr=15/01JXAMPLE123456789.json.gz2. Check Worker Logs In the Cloudflare dashboard, go to Workers & Pages → your worker → Logs. You should see:
Processing file: event_date=2025-05-20/hr=15/01JXAMPLE123456789.json.gz
Successfully processed 2 records from event_date=2025-05-20/hr=15/01JXAMPLE123456789.json.gz
Successfully appended 2 records to Iceberg table
3. Query Your Iceberg Table Use the same DuckDB approach from your previous post:
from pyiceberg.catalog.rest import RestCatalog
import duckdb

# Connect to catalog
catalog = RestCatalog(
    name="company_intel",
    uri=CATALOG_URI,
    warehouse=WAREHOUSE,
    token=TOKEN
)

# Load table and query recent data
table = catalog.load_table(("linkedin_data", "posts"))
df = table.scan().to_arrow().to_pandas()

# Check our test data
recent_posts = df[df['post_id'].str.startswith('test_')].sort_values('timestamp')
print("Test posts found:")
print(recent_posts[['post_id', 'content', 'processed_at']])
You should see your test data with processed_at timestamps showing when the Worker processed them.
Validate the Automation
To really test the automation, send a few more events spaced out over time:
# Send another batch after 5 minutes
curl "https://your-pipeline-endpoint.pipelines.cloudflare.com/" \
  -d '[{"post_id": "auto_test_1", "content": "Automated processing test", "timestamp": "'$(date -u +%Y-%m-%dT%H:%M:%SZ)'"}]'
Each batch should automatically:
- Land in R2 within Pipeline’s batch window (up to 5 minutes)
- Trigger a notification immediately
- Get processed by your Worker within seconds
- Appear in your Iceberg table ready to query
If any step fails, check the Worker logs for error messages.
What’s Next: Advanced Patterns
Now that you have a working event-driven data lake, here are some patterns you might want to explore:
Multiple Data Sources
- Set up different Pipelines for different data types (web analytics, API logs, etc.)
- Use different prefixes and route to different Iceberg tables
- One Worker can handle multiple notification rules
Schema Evolution
- Add new fields to your data sources
- Use Iceberg’s built-in schema evolution capabilities
- Handle backward compatibility automatically
Data Quality and Validation
- Add data validation before writing to Iceberg
- Dead letter queues for malformed records
- Duplicate detection and deduplication
Real-time Analytics
- Stream data to multiple destinations (Iceberg + real-time dashboard)
- Use Workers to calculate real-time metrics
- Trigger alerts based on data patterns
Multi-Cloud Integration
- Use the same pipeline to replicate data to other clouds
- DuckDB can query your Iceberg tables from anywhere
- No vendor lock-in with open standards
Advanced Querying
- Set up automated report generation
- Connect BI tools directly to your Iceberg tables
- Build APIs that query your data lake
The beauty of this architecture is that it’s completely modular. Each piece can be extended independently without breaking the others. You’ve built the foundation - now you can grow it in whatever direction your use case demands.